DIY Wooden Christmas Signs are easily one of my favorite ways to decorate and this Snowman Painting on wood doesn’t disappoint! I love placing wooden signs around my home and even on my porch to decorate for the holidays! (You can see all my favorite DIY Signs here)
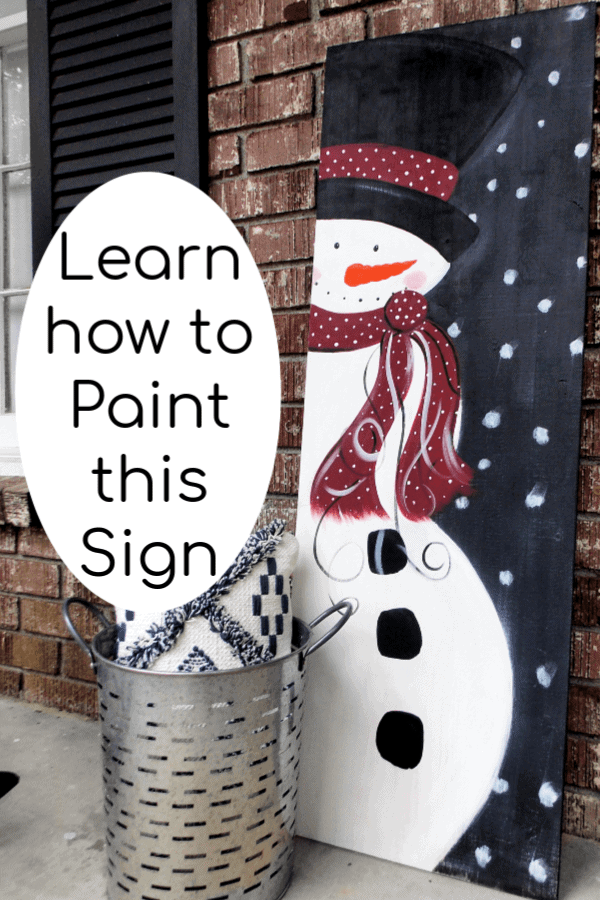
Learn how to DIY Wooden Christmas Signs like this painted snowman!
Whether created on pallet wood, spare doors or drawer fronts, spare wood, or wood blanks purchased from the home improvement store, DIY signs are easy to store or even simply flip over to reflect a new decorative sign! Whats fun and less intimidating about this guy though is there are no painted letters or numbers to intimidate us!
PLUS be sure to head down to the bottom of this article for LOTS of other great project ideas including a link to my article “DIY Signs You will Love and Want to Make”!

Where in the world, you ask, did I find the inspiration for this adorable DIY project?? Well, Im so happy you asked! BECAUSE I HAVE to point you over to exactly where I pulled this from.
Ashley runs this amazing page called Shabby Chic N Grace
I did what any respectful hope-to-be artist might do. I messaged her! It meant swallowing every bit of pride and flat out telling her I just love him and asking if she minded if I created him! (I cant even say “inspired by”- I was terrified to not basically copy it brush stroke by brush stroke for fear of messing it up!) SHE WAS SO SWEET! She absolutely loved it.
I still wasn’t convinced I would brave it but then a sweet friend messaged me asking if I would host a paint party! ….I let her know I had the PERFECT design in mind and of course they all loved it!
What you will need to paint this snowman on wood
A Board: this can be a canvas, spare wood, or wood purchased from the home improvement store. Just get something that will suit the size you need! Mine happened to be a 48″ x 16″ plank from Lowes
Pencil: To draw the outline
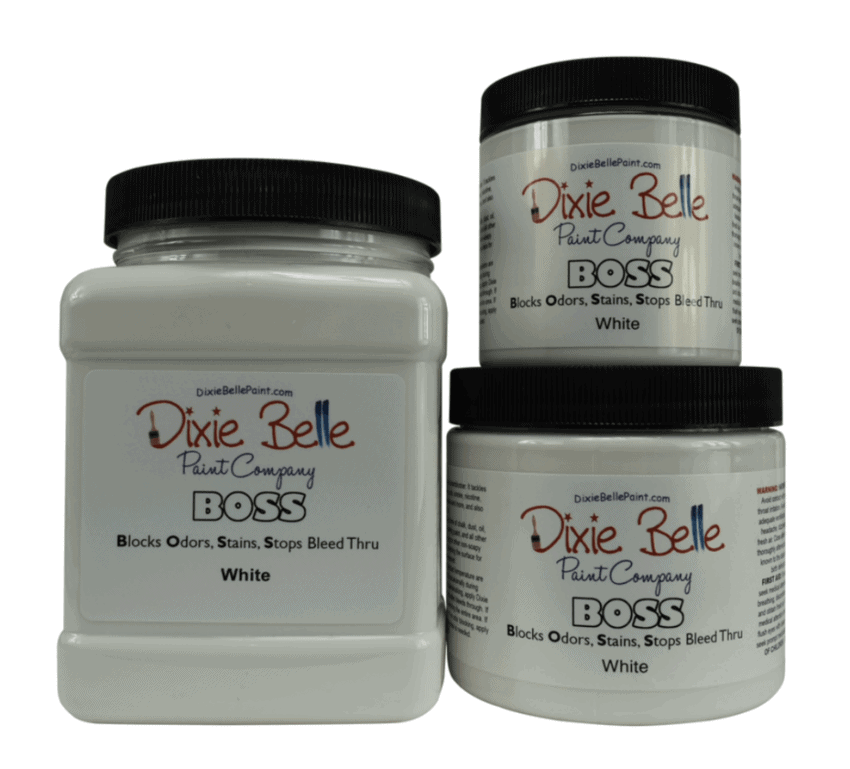
Primer: If I have a raw wood board I always seal it first. Otherwise oils from the wood can seep through and discolor my work! I favorite primer to use is water based, non smelly, and has NEVER failed me! It’s called BOSS from Dixie Belle. Of course you can, and I used to use shellac but I really never loved all the precautions and such that I had to take with it! You can find Dixie Belles BOSS in both Clear and White here! I love keeping a container (Or lets face it-4) on hand for my projects!
Sealer: I LOVE Dixie Belles Gator Hide because its Water repellant. Perfect for my porch sign! And one container will be enough for MANY projects! For signs that will be kept indoors I love to seal with Big Mamas Butta! Just wipe it on, then wipe excess off! You can find Gator Hide Here or Big Mamas Butta Here
Paint: I love to have products on hand that will last and I dont have to buy each time I have a project. So I get containers of Dixie Belle Paint (that are available in 8, 16, 32 oz and EVEN 1 Gallon!!) and they are ready when I am! For this project I used “Cotton” (white), “Caviar” (Black), “Florida Orange” (Orange… lol) & “Barn Red” (Red!) …of course you can use any colors you like! But you can find Dixie Belle Paints Here. I tend to prefer their paints because they are similar to chalk paint in their ease of use and adhesion but less “chalky” so they need less sealing, look more consistent, and are easier to work with.
Paint Brushes: Believe it or not I used Makeup Brushes a lot! You can find my Make Up Brushes Here but I also keep my favorite flat brush on hand for larger areas and those are the Dixie Belle (super friendly to your hands) Synthetic Brushes! You can find Dixie Belle Paint Brushes Here.
Water Bottle: in case the paint begins to drag. I tend to always spray as I go to minimize drag and texture in my paint. You can find my Misting Bottle Here
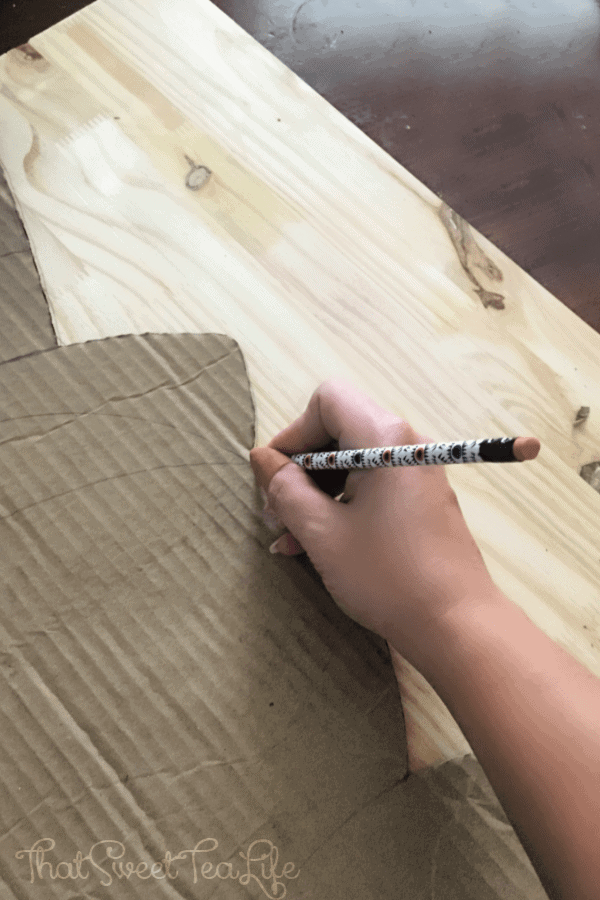
Cardboard: If you want to reproduce them you may want to make a template out of cardboard that you can use to recreate the outline with!
DIY Wood Signs : Snowman : The How-to
First thing is priming. (assuming the surface is clean and smooth-if not address that first) This is seriously a must no matter the paint you use. If you don’t, you risk the paint lookin odd in different areas or the oils and stain from the wood bleeding into your paint! (Especially that white!!).
My favorite primer to use is Dixie Belles BOSS since you can use it safely indoors! BUT it also does the job which is kind of unheard of when it comes to water based products. It comes in White and Clear. I used Clear for this project.
I laid two coats (allowing 30 minutes between the two). Then after everything was dry I went on to draw out the outline!
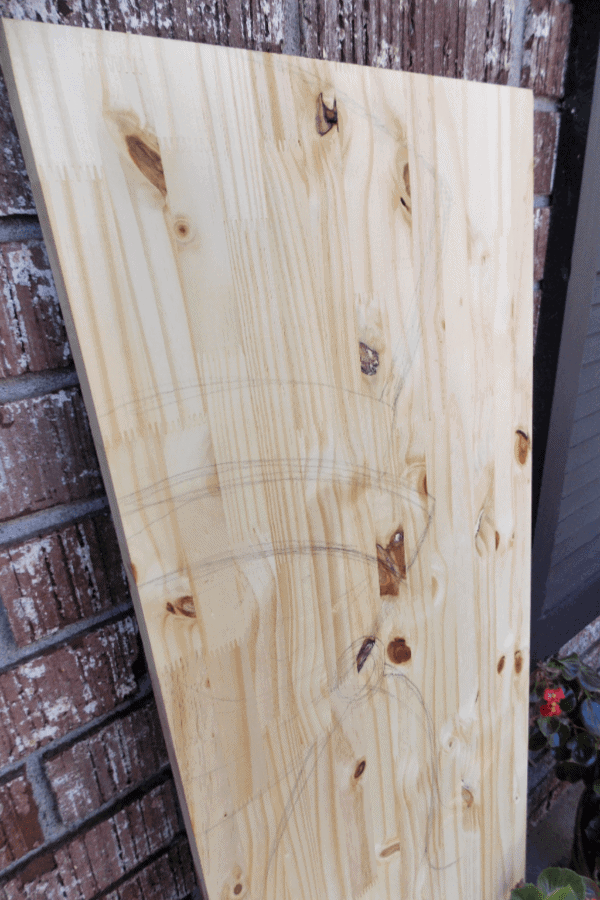
Later I ended up redrawing the snowman on cardboard cut to the same size as the class boards we would be using. Then I cut out the edge to serve as a template so each board would have the same beginnings of a snowman!
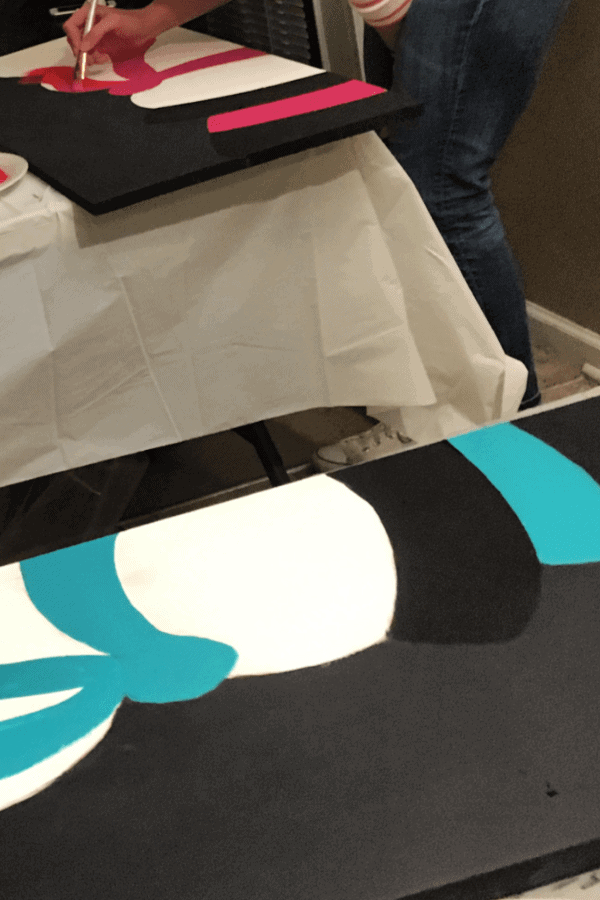
The next step is color blocking our snowman painting. At this point we are just laying the base color for each space. I was far too excited to paint and completely forgot to photograph mine in this phase! BUT I did take a picture when I was teaching the class.
You may need to do 2-3 coats of each color block, using your brush to sharpen the edges as needed. Be sure to allow each coat to dry well before adding another coat. You can leave it and come back or grab a hairdryer set to low heat.
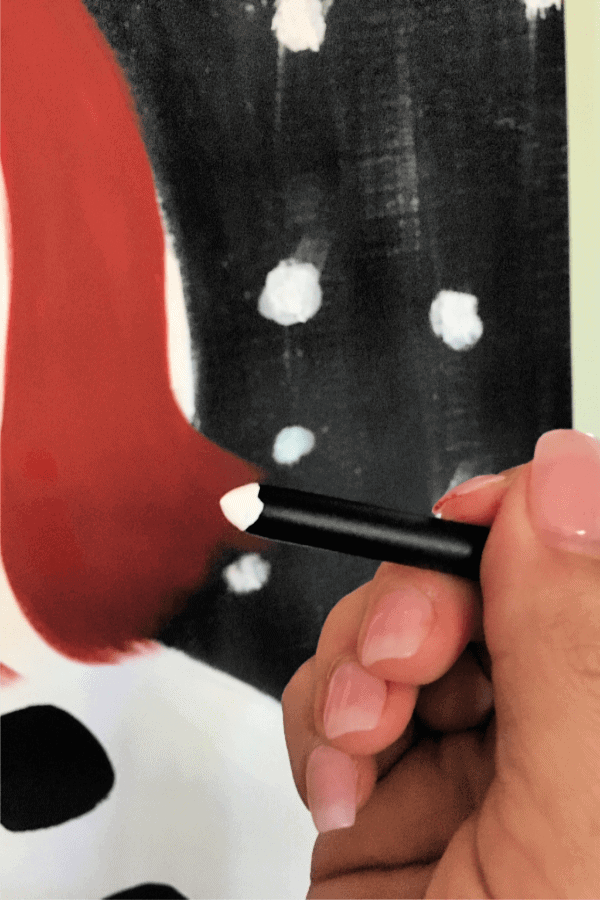
Once you have the use colors laid, its time to embellish. You can add shimmer, polka dots, swirls,.. the possibilities are endless! JUST HAVE FUN! After all,.. its only paint!
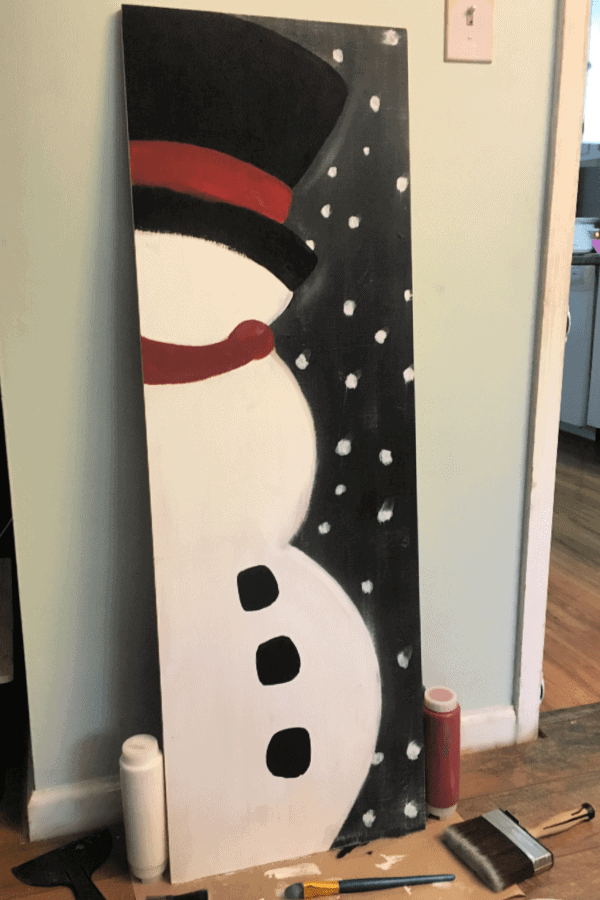
For the polka dots there are a couple things you can do to make it easier on yourself. I didn’t use them, but for the snow you may opt to use these sponge pouncers. Personally I wanted imperfect and used my paint brush for that then proceeded to use it on his pink cheeks and the coal lumps. (for the cheek color I just mixed a tiny amount of the Barn Red into my cotton)
For the tiny dots you can usually use the back end of a paint brush! Don’t be scared to load it up (to the point just before dripping) then just dab it on the surface and pull it back up straight! I used this approach on the scarf and band around the hat.
Last is the carrot nose! Feel free to sketch it out with pencil or chalk before hand. And we are done! I ended up just using my lovely Big Mamas Butta! Just brush it in, leave it for a while and wipe away any excess with a lint free cloth.
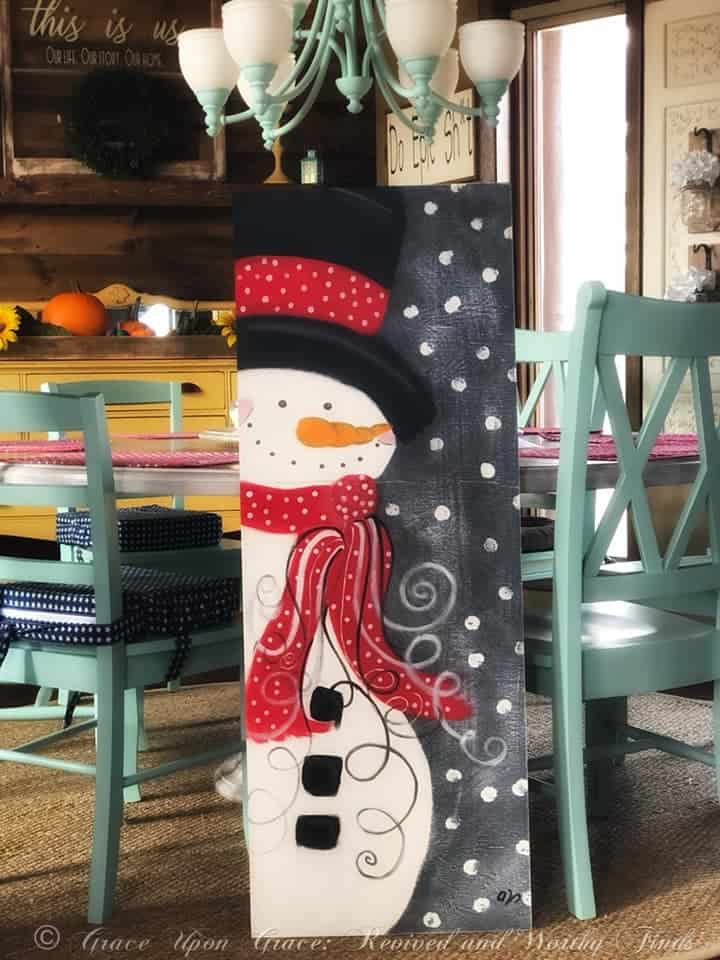
Isn’t our Snowman Painting so happy and cute??
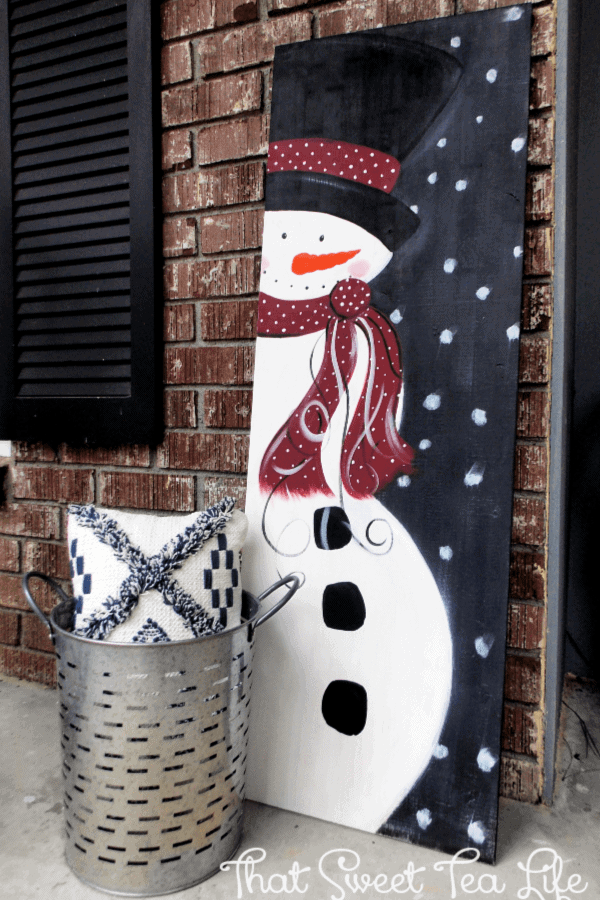
I love that it can be used in so many places and you can even paint the back side in a different theme! I could see it in a smaller size on a counter or mantel, or an oversized one beside a fireplace! Want to see more DIY Sign Ideas? be sure to check out DIY Wood Signs You will Love (And want to make!)
Thea Osborne is a celebrated blogger renowned for her expertise in DIY and paint techniques. With a keen understanding of Southern culture, Thea’s commitment to producing engaging and informative content, coupled with her detailed tutorials, inspire her readers to embrace their own creative pursuits.
Thea’s passion and creativity have left a lasting impact in the DIY community, transforming “That Sweet Tea Life” into a thriving and cherished resource.
Shelly
Thursday 28th of November 2019
So cute! May I ask when in the process you did the background color?
Thea Osborne
Friday 29th of November 2019
Hey Shelly! If you look at the photo after I drew the template, you will see where I "color blocked". The background was painted during that process. So, the snowman isn't paint "on" the background, but rather each color is painted in. Not that there is anything wrong with painting over the background, I just didn't want to deal with that dry time unnecessarily. Hope that helps! xoxo Thea
Brooke
Wednesday 21st of November 2018
I want to make this!! Love how it turned out, great job Thea!!
Jessica Lehman
Wednesday 21st of November 2018
Love this ! Great tutorial!
Michele
Wednesday 27th of November 2019
Hi I want to make this but don’t see where to get the outline for the snowman??
Betsy @ Happily Ever After, Etc
Wednesday 21st of November 2018
He's so whispy and cute! I completely understand why you fell in love with him! I bet your paint class was so much fun.
Sarah
Tuesday 20th of November 2018
I love this snowman, the design looked intimidating but your steps on how to paint it are really clear and helpful. I would love to have something like this on my front porch.
Thea Osborne
Friday 28th of February 2020
Thank you! Im glad you enjoyed it!