Do you have a favorite family recipe? Maybe something that’s been passed down in your family? I saw a lady on TV the other day who had a recipe for banana cake with a rum glaze that her grandma had taught her and she was going to be teaching it to her teenage grandson to keep the tradition going.
She said she makes it regularly because every time she does, she feels closer to her grandma that’s no longer with her. You know where she kept the recipe? Hanging on the side of her fridge! Where it could get dirty, ripped, or even lost! It got me thinking… how could she honor her grandmother even more and make something beautiful for her kitchen?
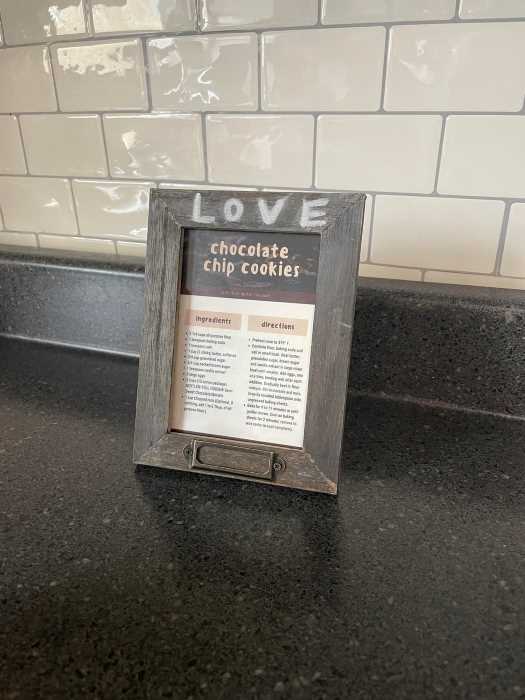
A framed recipe!
Why Frame a Recipe?
A recipe frame pulls double duty. It gives you a beautiful decoration in your kitchen and it honors your family’s traditions, keeping them safe, clean, and shining. I decided to visit my local dollar tree and see what I could find to make something practical and beautiful, to save one of my favorite family recipes.
Follow along to see exactly how to make your own recipe frame to keep your family traditions alive and well!
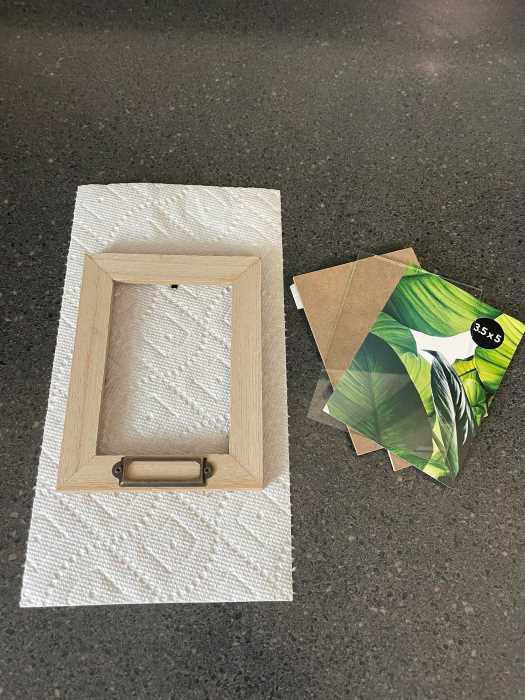
Supplies Needed for Your Recipe Frame
- Photo Frame
There are many different options of frames at the Dollar Tree. They have wooden ones, metal ones, or plastic ones, and they have a wide range of sizes. So if you have a lot of space to decorate, you could get a larger one. I chose a small 3″x5″ because it’s just going to sit on my counter and I don’t want it too take up too much space. You know how precious counter space is, right?!
- Paint
If you choose a metal or plastic frame, you can skip the paint part because this craft paint won’t stick. If you’d like to change the color of a metal or plastic frame, chalk paint would be an option for you! You can find that at just about any craft store and it will stick well to almost any surface.
If you’ve chosen the wooden frame, choose a color that matches your kitchen. I’ve got black and white checkered floors with white and green cabinets and a grey counter, so I chose to go with a black. Dollar Tree had a ton of options, even some glittery ones if that’s more your style!
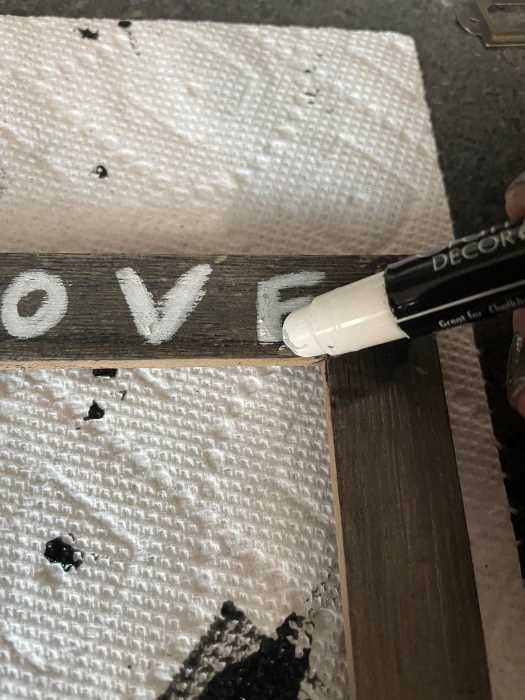
- Chalk Pen
I got a chalk pen to write on the top of my frame. It will work well because I’m using black paint. If you’ve chosen another color, a sharpie may be a good, affordable option. There are also other colored paint pens available at your local craft stores!
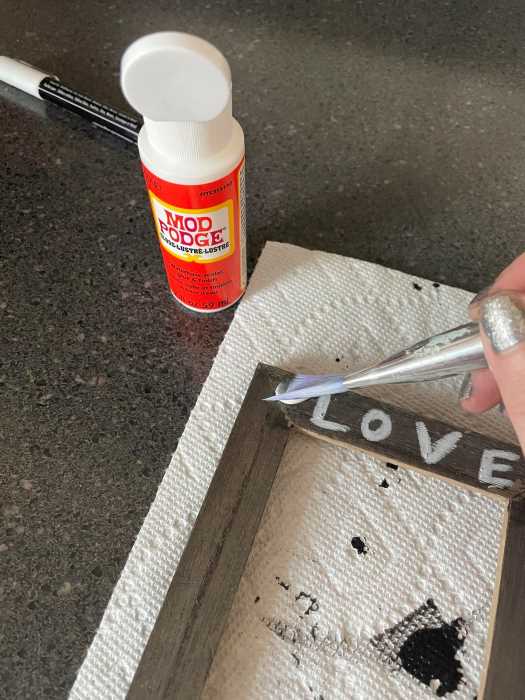
- Mod Podge
Since I’m using a chalk pen, I got some Mod Podge to seal the ink in, since it is removable. If you choose to distress your recipe frame, it will also protect it against any more distressing or wear and tear.

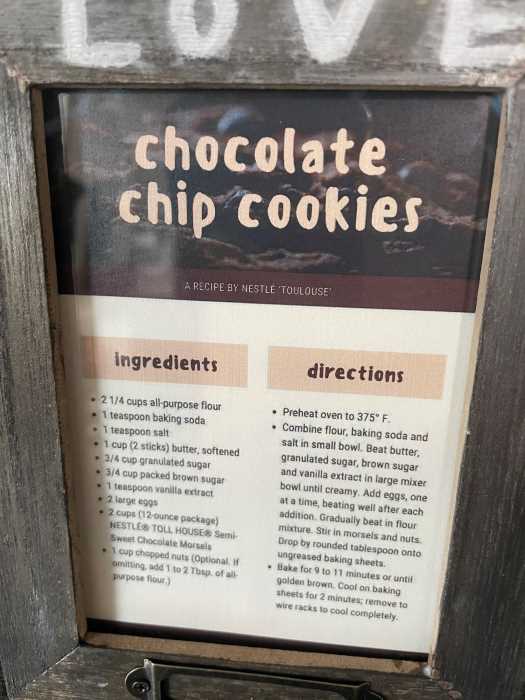
- Recipe Card
This is where you can get creative! If you’ve got a handwritten recipe card, get a frame that’s going to fit it! It would be so special to have your family’s own handwriting framed in your kitchen. What a sweet way to be remembered! If you are looking to use a frame you’ve already got and the frame is too big or too small to work, it’s time to make it work.
If you feel your frame is too big to fit the recipe card well, raid your (or a friend’s) scrapbooking stash and find a pretty piece of decorative paper to act as a mat. You can use painters tape to temporarily stick the background paper and your card together, or if you don’t mind the permanence, just use a glue stick to attach the recipe card to the scrapbook paper. The inside of a brown paper bag from a grocery store could work well to use as a mat, too, especially if you’ve got a more rustic kitchen.
If your frame is too small and you don’t want to cut or trim your recipe card, you could take a clear picture of it or scan it into your computer and resize and print it.
If you don’t have a recipe card at all (I don’t!), it’s time to make one. There are all kinds of fancy programs you can buy to design something, but those can be difficult to learn and expensive if you don’t already have one. I recommend using something online to create one.
Canva is a fantastic resource for great, easy design jobs. You can pay for a subscription to get more options, but the free, included graphics will be more than enough. Simply search “recipe card” on the front page and you’ll be able to scroll through a ton of templates. You can change the photos, the words, and even some of the colors to match your style and the recipe you’re using. My recipe card was made completely free using one of Canva’s templates!
Steps to Make Recipe Frame
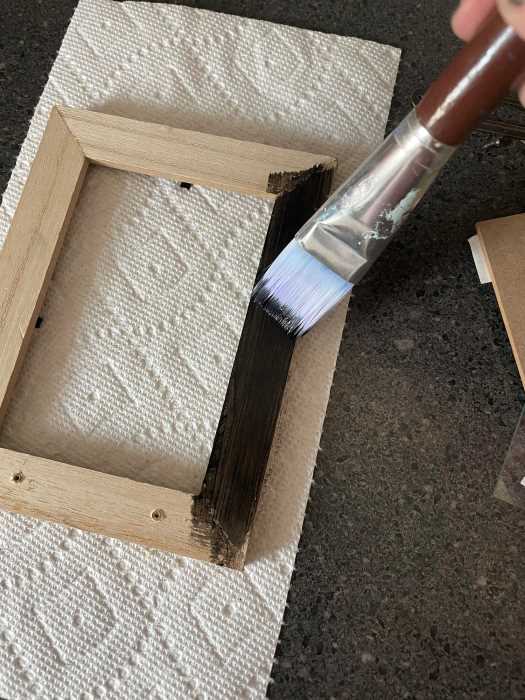
1. Prepare Your Frame to Paint
First, you need to prepare your frame to paint. Remove the back and take out the glass to avoid getting any paint on it. Next, go ahead and get some newpaper, paper towels, or a trash bag out on your painting surface to keep it nice and clean, too.
2. Paint your Frame
This step is pretty straightforward— paint your frame! You can decide how covered you want it. I decided to leave mine with just one thin coat so that the black paint acted almost as a dark stain. I painted a thin coat on and then wiped it off with a paper towel. The sides were a different texture and the paint didn’t wipe off as well, but it looks fine because it just appears shadowed.
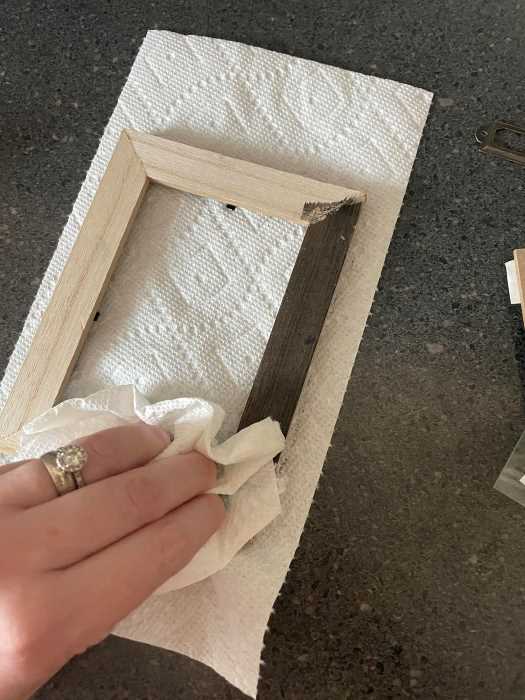
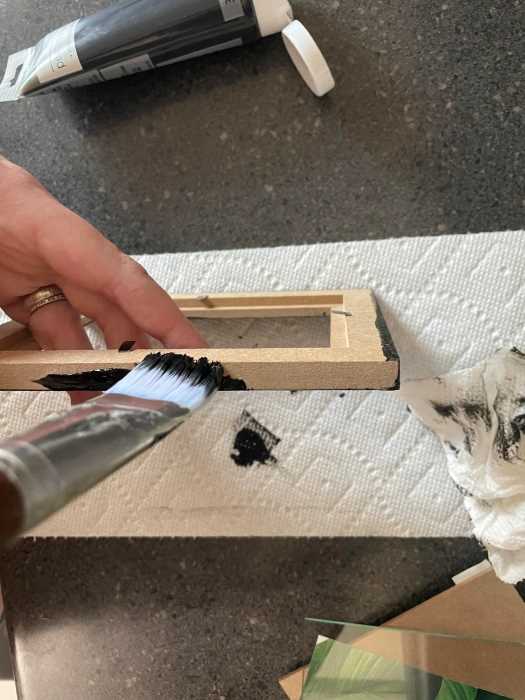
Whatever you decide to do, make sure each coat of paint is completely dry before painting it again. If you skip that, all you’re going to do is smear half dry paint and make it harder on yourself in the long run.
3. Prepare your Recipe
Now, get your recipe ready. If you’re using Canva, save it to your computer and then print. If you’re using your own physical recipe card, go ahead and attach it to some paper or digitally resize it depending on how it fits in the frame.
4. Put the Recipe In the Recipe Frame
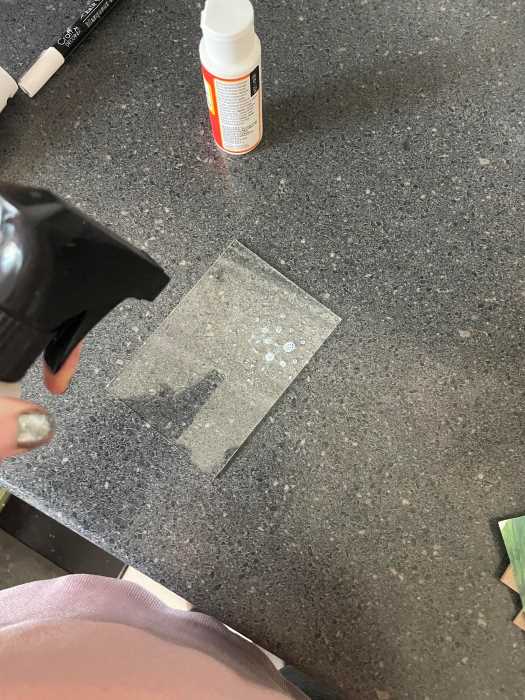
Using a glass cleaner, clean the glass for your recipe frame really well before inserting it back into the frame. The last thing you want in your brand new decoration is a pesky fingerprint on the inside of the glass! Once you’ve put the glass back in, lay your recipe face down against the glass. Then place the back of your frame and secure it down.
5. Place your Framed Recipe in your Kitchen and Admire It!
Seriously, admire your work! You’ve created a family heirloom that can be passed down through your family for generations. There’s something special about a family recipe. It’s your traditions, your culture, really, it’s your love poured into food. What you just made is special!
Q & As
This sounds great, but I’m on a budget. Where can I find these supplies?
Everything I used is from the Dollar Tree! It cost me a whopping $4.00 + tax for everything I used to make this recipe frame. I was very impressed with the Dollar Tree’s new crafting options. There were a ton of new beads you could use to jazz up your frame and stickers that could be used in place of your own handwriting. If you decide to use any stickers, the Mod Podge is still important so it seals them on and prevents them from peeling off.
I don’t have a recipe card, I just know it by heart. How do I frame that?
Not having a physical recipe card means you get to be extra creative! If you have them available, you could make a cool recipe card on something like Photoshop or Illustrator. If you don’t have those, don’t worry about it because they’re pricey to buy and challenging to learn.
There are a ton of free design tools online. The best quality one, in my opinion, is Canva. They have a ton of free templates you can personalize to make them your own. They even have a lot of recipe card templates, which are perfect for this recipe frame project!
You can change the words, replace the photos, and change colors on most of their templates. If you’ve got an idea of what you want your card to look like and can’t find it in their template library, you can start with a blank canvas and use their graphics, backgrounds, and fonts to make your own from scratch! That’s what I did.
Everything you see on my card was included in their free option. Once you’ve got it designed, simply download it onto your computer and print it out! If you don’t have a printer at home, you can always ask a friend or take it to the library and use one of their printers for a very, very small fee.
Wrapping it Up
Now that you know how to make your own recipe frame on a budget, you can make more of them as gifts! These would be fantastic wedding gifts or a birthday gift for a family member. It’s easy to personalize to each individual and is a very thoughtful, sentimental gift for someone you love.
When you make one, let us know in the comments! We can’t wait to see your creativity!


Stephanie Lamberth is a writer who loves crafting, playing board games with family and friends, and cozying up in a warm blanket to get lost in good fiction books.
Crafting has been a part of her life for as long as she can remember. She comes by it naturally, with her mom encouraging it from a young age with a craft bin always busting from the seams with goodies to experiment with and explore. Her favorite things to craft these days are gifts to give family and friends because it’s an opportunity to express creativity and love at the same time!
She currently lives with her husband and three kids in Tennessee. They all work and school from home and love spending time together!
Stephanie can be reached at [email protected]