Coasters work hard to keep your wooden surfaces in tip-top shape, but they don’t have to look like workhorses. Painted coasters do the job while adding some pizzazz and personality to your space!
You can DIY these at home in many ways, so read on to get your creative juices flowing.
Types of Coasters to Paint
A huge benefit of making your own painted coasters is the wide range of items you can paint. Whether your home is glam, country, modern, or anything in between, there is a material ready to be painted which matches your aesthetic.
Ceramic
Ceramic tiles are a cost-effective way to make unique coasters.
These are available at most major home improvement stores. If bought there, you’ll need to purchase additional supplies like glue and thin cork or felt to attach to the bottom to make them soft for your surfaces.
If you’re looking to buy everything you need in one place, grab a kit online. This tile coaster kit comes with 24 coasters and 24 pieces of thin cork with adhesive backing, pre-cut to the exact same size as the tiles!
Cork
If you want a painted coaster with a bit more texture, try out thicker pieces of cork!
You can find cork in most gardening centers because it’s regularly used to go underneath potted plants due to its natural absorbency.
Cork coasters are kid-friendly. Dropping a ceramic or terracotta coaster could leave sharp edges, but cork won’t!
Pick up a set of 12 cork coasters and have them delivered to your door.
Terracotta
Terracotta plates can make spectacular painted coasters in an earthier, more boho-inspired space!
Since their conventional use is to hold terracotta pots, each plate has a raised lip around the outer edge. While it’s meant to keep the pots in place, it also comes in handy with cups.
These coasters are available anywhere you can find terracotta pots, including Dollar Tree in the right season, or you can grab a 12-pack of terracotta plates online.
Similarly to ceramic tiles, it’s a good idea to put something soft on the bottom since you’ll be moving and scooting them much more than you would if they were underneath a pot.
Wood
Using wood slices as painted coasters is an eco-friendly way to bring a little of the outdoors inside your home.
While you can buy pre-cut wood slices online, this is a great use for a fallen tree or limbs that have been cut from your yard. Most coasters are 4-4.5 inches in diameter, so make sure limbs are the right size before slicing.
If using wood from your backyard, sand the tops and bottoms well to avoid any unwanted splinters!
8 Painted Coaster Ideas
Now that you’ve picked the coaster you want to paint, it’s time to get painting!

Solid Colors
Sometimes the simpler something is, the better. Whether you fancy yourself a Picasso-in-training or have never picked up a paintbrush, you can paint coasters a solid color!
What You Need:
What To Do:
- Use painter’s tape to tape the edges of the coaster to create clean lines.
- Pick your favorite paint color and use a small paintbrush to completely fill in the coaster’s surface.
- Let dry and repeat again. Add a third thin coat if necessary for even coverage.
- Let dry, remove the tape, and seal with the chosen protectant.
Geometric
Thin painter’s tape will leave you with sharp lines and interesting geometric shapes. Don’t worry about making every painted coaster exactly the same. Slight variations will add visual interest.
What You Need:
What To Do:
- Take strips of the thin tape and crisscross them across the coaster. Be as exact or free as you’d like.
- Use a thin paintbrush to paint the shapes created by the tape. Paint them all one color, or paint them a variety of colors. If using multiple colors, give each color a bit to dry before moving on to the next one to avoid mixing paint colors.
- Let dry and repeat with a second coat.
- Remove the tape and seal.
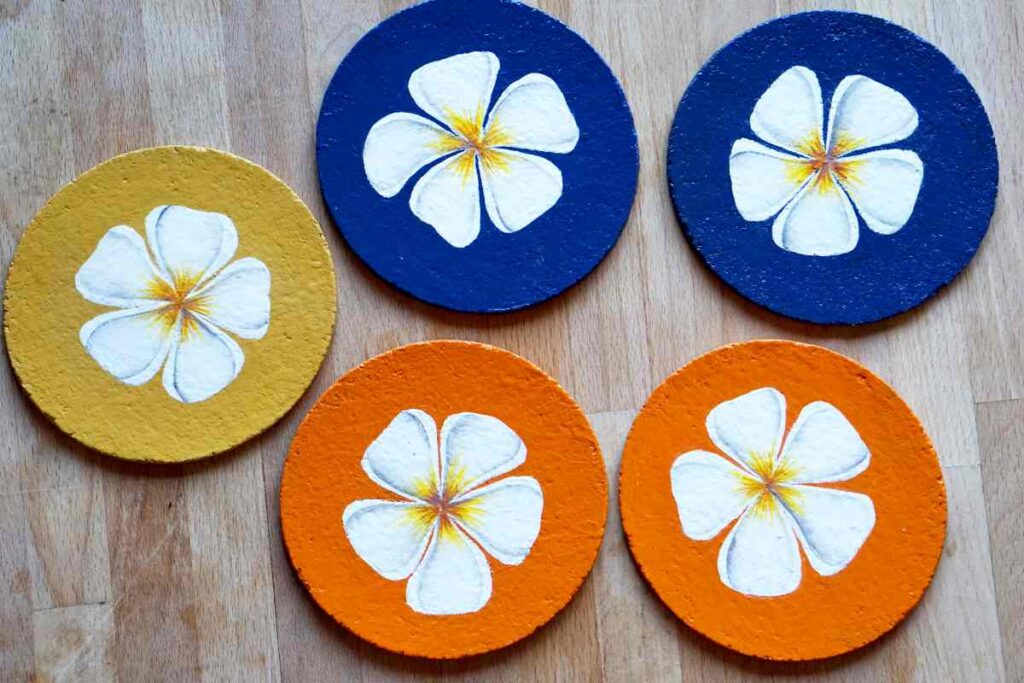
Words
Whether you want coasters full of your favorite quotes or you’re channeling Rae Dunn, putting words on your painted coasters is a great way to add some personality to your home.

What You Need:
What To Do:
- Sketch out your design on the coaster with a pencil. You can erase and redo it as many times as it takes to make it look the way you want.
- Write over the pencil sketch with the paint pen.
- Allow the paint to dry, and add another coat of paint.
- After it’s fully dried, use an eraser to gently erase any stray pencil marks. Then seal the coaster.
Paint Strokes
This is another painted coaster technique that anyone could do. It’s also easy to add a bit of variation by changing how spread out or close together the paint strokes are. You could leave a lot of blank space or layer the strokes on each other to cover the coaster completely.
What You Need:
What To Do:
- Before painting the coaster, play around with brush strokes on a scrap piece of paper. The shape of the stroke will change depending on the brush you use and the amount of pressure you apply to the brush strokes.
- Add your paint strokes! This is your painted coaster; you get to decide how you do it. If layering multiple colors, let each layer dry before moving on to the next.
- Seal with preferred protectant.
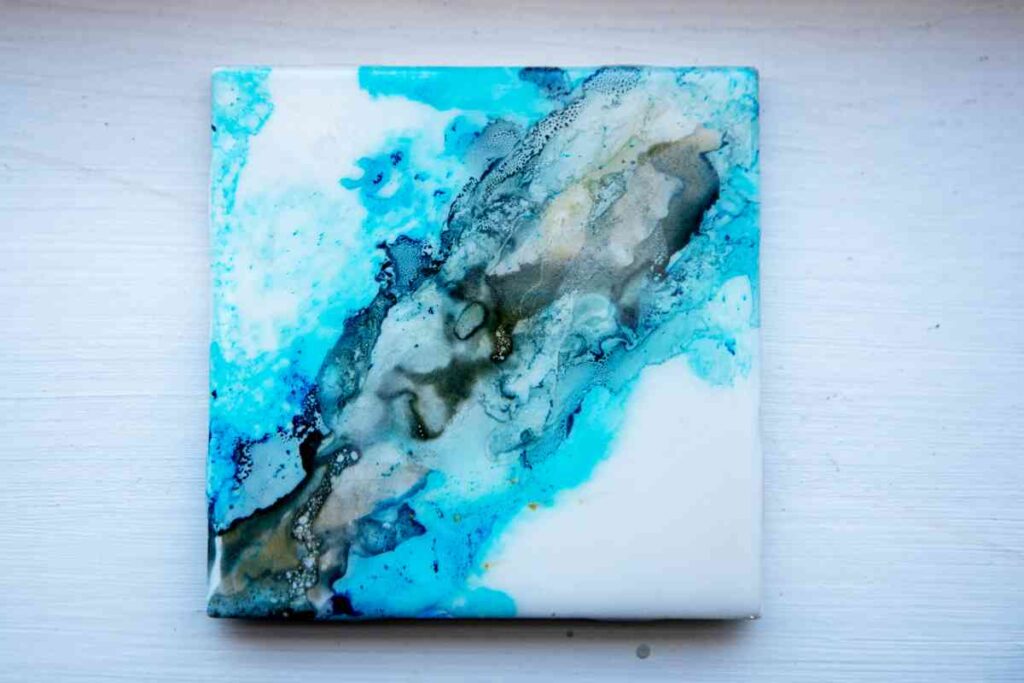
Watercolor
Watercolor-painted coasters will work best on uncoated ceramic tiles. Most times, if the tile is advertised as a craft project, it will be unglazed already. If buying a tile from a home improvement store, make sure to double-check whether they’re glazed or not.
What You Need:
Watercolor Paint Set OR Watercolor Paint Pens
What To Do:
- Use the spray bottle to cover the coaster with a fine mist.
- Take the watercolor paintbrush or pen and add colors as you desire. If you’re new to watercolor, abstract “blobs” are the easiest. Make sure to use colors that will blend well together.
- Allow painted coasters to dry and then seal.
Cotton Swab Dots
This painted coaster technique is perfect for a DIY gift from children. It’s relatively mess-free and incredibly simple.

What You Need:
What To Do:
- Put dollops of chosen paint colors onto a paper plate.
- Dip one end of a cotton swab into the paint and make dots on the coaster.
- Use a different cotton swab for each paint color to avoid mixing colors.
- Let dry and seal to protect the paint.
Just the Edges
If you want to enjoy the natural absorbency of cork or terracotta and still have painted coasters in your home, try painting just the edges!
What You Need:
What To Do:
- Use painter’s tape to cover the perimeter on the top and bottom of the coaster.
- Hold the coaster between two fingers and paint the outer edge.
- Let dry and repeat with a second coat
- Seal with chosen protectant.
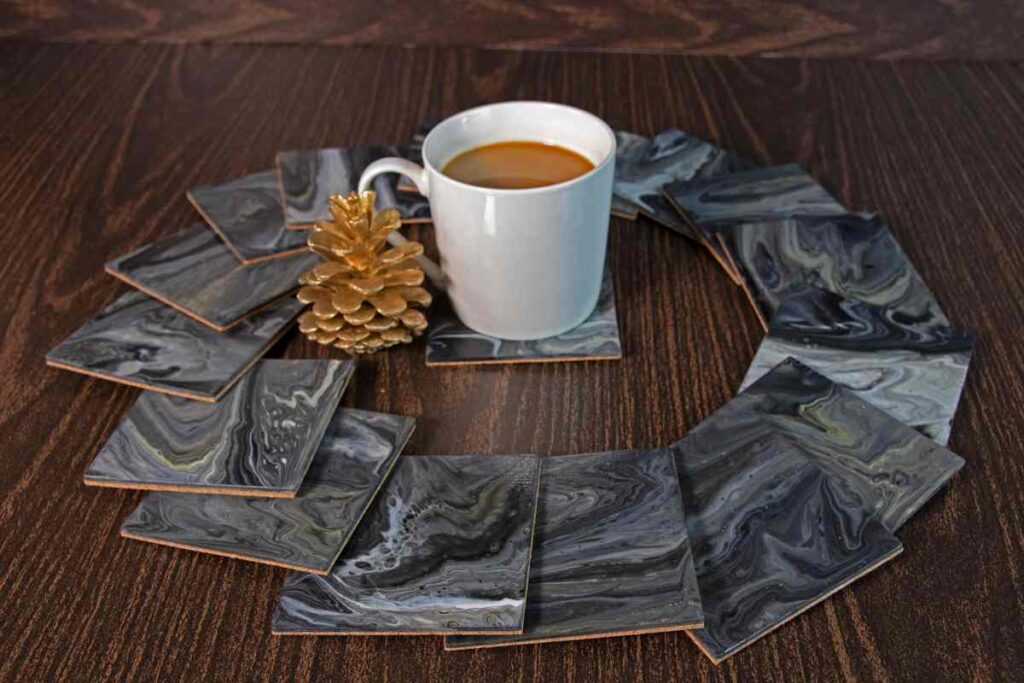
Paint Pour
This one is the most advanced and involved of all the techniques. However, it’s well worth the extra effort. These painted coasters turn out to look like miniature masterpieces!
What You Need:
Small Disposable Cups (between 7 oz. to 9 oz.)
What To Do:
- Add a small amount of pouring medium to a disposable cup. It should go about an inch up in the cup.
- Squeeze your first color of acrylic paint into the pouring medium.
- Add a second color, squeezing less than you did on the first one.
- Put in your third color, adding even less than the first two.
- Use the skewer to carefully swirl the paint inside the pouring medium, taking care not to mix them completely.
- Put another disposable cup upside down on a covered surface (it will get messy) and place your coaster on top.
- Pour the paint over the coaster.
- Gently pick up the coaster by the edges and tilt it to cover it fully, and move the paint around more.
- Place back on the upside-down cup to dry for a full 24 hours.
- Seal them with chosen protectant after 24 hours and then leave to dry longer, sometimes up to two weeks. This is especially important if using hot drinks.
How to Make Your Painted Coasters Last
Once you’ve painted your coasters, it’s time to seal them. Pick the one that’s best for you and your project.
Mod Podge
Mod Podge is a crafter’s best friend. It comes in a matte finish or glossy finish that can be used as a sealer on your painted coasters.
Use a foam brush to add 3-4 thin coats, drying between each, after the paint is dried.
Polyurethane
Apply polyurethane sealant with a paintbrush to your finished coasters. This is more heavy-duty than other sealants, so it’s perfect for coasters that will be heavily used or live on a patio.
Clear Spray Sealer
If you’re making a lot of painted coasters, clear spray sealer will be your best friend. It saves time and offers great coverage. Krylon’s Triple Thick boasts that one coat equals three coats of other sealants!
Wrapping up DIY Painted Coasters
Painted coasters will keep your tables safe and look great doing it. Whether you’re spicing up your space or making gifts for someone you love, DIYing your coasters is easy and tons of fun!Looking for more DIY projects? Check out our Crafting Page!

Stephanie Lamberth is a writer who loves crafting, playing board games with family and friends, and cozying up in a warm blanket to get lost in good fiction books.
Crafting has been a part of her life for as long as she can remember. She comes by it naturally, with her mom encouraging it from a young age with a craft bin always busting from the seams with goodies to experiment with and explore. Her favorite things to craft these days are gifts to give family and friends because it’s an opportunity to express creativity and love at the same time!
She currently lives with her husband and three kids in Tennessee. They all work and school from home and love spending time together!
Stephanie can be reached at [email protected]