When you’re getting ready for a paint project, odds are good that you’re heading to a paint store or a hardware store to get your supplies. But did you know that you could walk into your kitchen and find 95% of what you need to make your own paint inside your refrigerator and your cabinets? Because you can! Milk paint is a wonderful way to create custom paint colors for all of your small painting projects.
Read ahead to find out exactly how to make your own old fashioned milk paint (and where to find some if you don’t want to!) and how to use it!

What is Old Fashioned Milk Paint?
Milk paint has been found on artifacts all the way back to ancient Egypt! It was regularly used on Shaker and colonial furniture and it is currently experiencing a resurgence in popularity because it’s made from non-toxic, all-natural ingredients.
Commercially available milk paint is made up of milk protein (casein) and lime (calcium carbonate), plus some sort of pigment for color and just a smidge of borax (sodium borate) as a preservative. It’s totally free of volatile organic compounds (VOCs) and it has no smell once dried.
Old fashioned milk paint is known for rich, saturated colors and a finish that can help you achieve an antiqued look. It can be applied to just about any surface with very little prep work, which is also a huge plus!

How to Make Your Own Old Fashioned Milk Paint
Materials Needed:
- 1 quart skim milk
- lemon
- cheesecloth
- sieve
- dry color pigment or artist’s acrylic paint (both available at art-supply stores)

How to do it:
1. Curdle Your Milk
In a large bowl, mix 1 quart of skim milk with the juice of one lemon (or you can substitute 1/2 cup of distilled white vinegar). Leave the mixture out overnight at room temperature so that the mixture has time to curdle. Sounds gross, but I promise you’ll love the result!
2. Separate Curds from Whey
After 24 hours, pour the curdled mixture through a sieve (or other mesh strainer) lined with cheese cloth to separate curds from the liquid whey. Make sure to have another bowl under the strainer to catch the whey because that’s what you’ll be using to make your old fashioned milk paint.
3(a). Add Dry Color Pigment
Wearing a mask, add 4 tablespoons of dry color pigment to the whey and stir until the pigment is dispersed evenly.
3(b). Add Artist’s Acrylic Paint
Add one drop of paint at a time to the leftover whey. Stir constantly until the desired hue is achieved.
4. Use the Paint
Whether you choose to use dry color pigment or artist’s acrylic paint, milk paint will spoil pretty fast, so you need to make sure you use it within a few hours of mixing it up. And don’t worry, the sour milk smell will completely disappear once it’s dried!

What If I Don’t Want to Make My Own?
I understand, sometimes when you’re DIYing, it’s nice to skip a few steps and use a pre-made medium. If that’s the case, read on to learn about my adventure with store-bought Old Fashioned Milk Paint powder to see if it’s for you!

My Adventure with Old Fashioned Milk Paint
I wanted to get a little more comfortable mixing milk paint colors. It can be scary to try something new, but I remembered— it’s just paint! If I didn’t like what I made the first time, I could try again.
Before I could start mixing paint, I had to find something to paint and I found this amazing little table with incredible details!
My hope was to make a color that looked like Charleston green, which was used years ago in historic downtown Charleston.
As history tells it, after the Civil War, the Union sent tons of institutional black paint to Charleston to help with the rebuilding efforts. Charleston decided they couldn’t incorporate such a harsh color into the Southern charm they were so proud of. So the people of Charleston decided to take yellow paint and add it to the black paint. The results were almost black with hints of green. You could only see the green from the right angle in the right light… but it was enough for them! That’s how they ended up with “Charleston green!”

Once I had my table and I knew the color I was going for, it was time to get to work. I grabbed a few different packages of my Old Fashioned Milk Paint. I started by mixing some Tavern Green and Federal Blue. I also had Pitch Black on standby since I was hoping to make a really dark, deep teal color.
After mixing the green and blue, I knew I needed some black. Little by little I added in the Pitch Black until it was perfect.
Remember, paint colors tend to deepen and darken as they dry, so if you’re going for a dark color like I was, don’t add too much black in or it will dry just looking black.
Once the paint was mixed, it was time to paint. As I mentioned before, this paint goes bad, so make sure to have the piece you’re painting ready to paint as soon as the paint is mixed!

When you’re using milk paint, make sure to put on a nice, thick coat. I flipped the table over and started with painting the bottom. Look at the amazing, chippy finish that was already starting as the paint was drying. Isn’t it amazing?!
Once the underside of the table was dry and looking amazing, I flipped it over and got the top completely painted.
When every bit of the table was dry, I went over the entire piece with steel wool. This is where the thick paint helps. It allows bigger chunks to fall off in the process of going over it with the steel wool, leaving small chips and imperfections in the painted surface.
This step isn’t absolutely necessary. The paint will chip off naturally over time, but this step hurries along the aging process, giving you the antique and distressed look you’re going for if you’re choosing to use milk paint in the first place.
Once the piece was where I wanted it to be distressed-wise, it was time to seal it.

Old Fashioned Milk Paint has so many different options of finishing, depending on how you’re going to use the piece you’ve painted.
I chose to use tung oil. To seal your milk paint with oil, simply rub the oil onto your paint surface with a lint-free rag or brush. Let the oil fully absorb into the milk paint furniture project, then repeat the application again. Do that as many times as necessary until the surface doesn’t absorb any more oil. Once you reach the point of oversaturation, just wipe away the excess oil and leave your paint project to cure. It takes 7-15 days to be completely dry to the touch and a full 30 days to be completely cured.

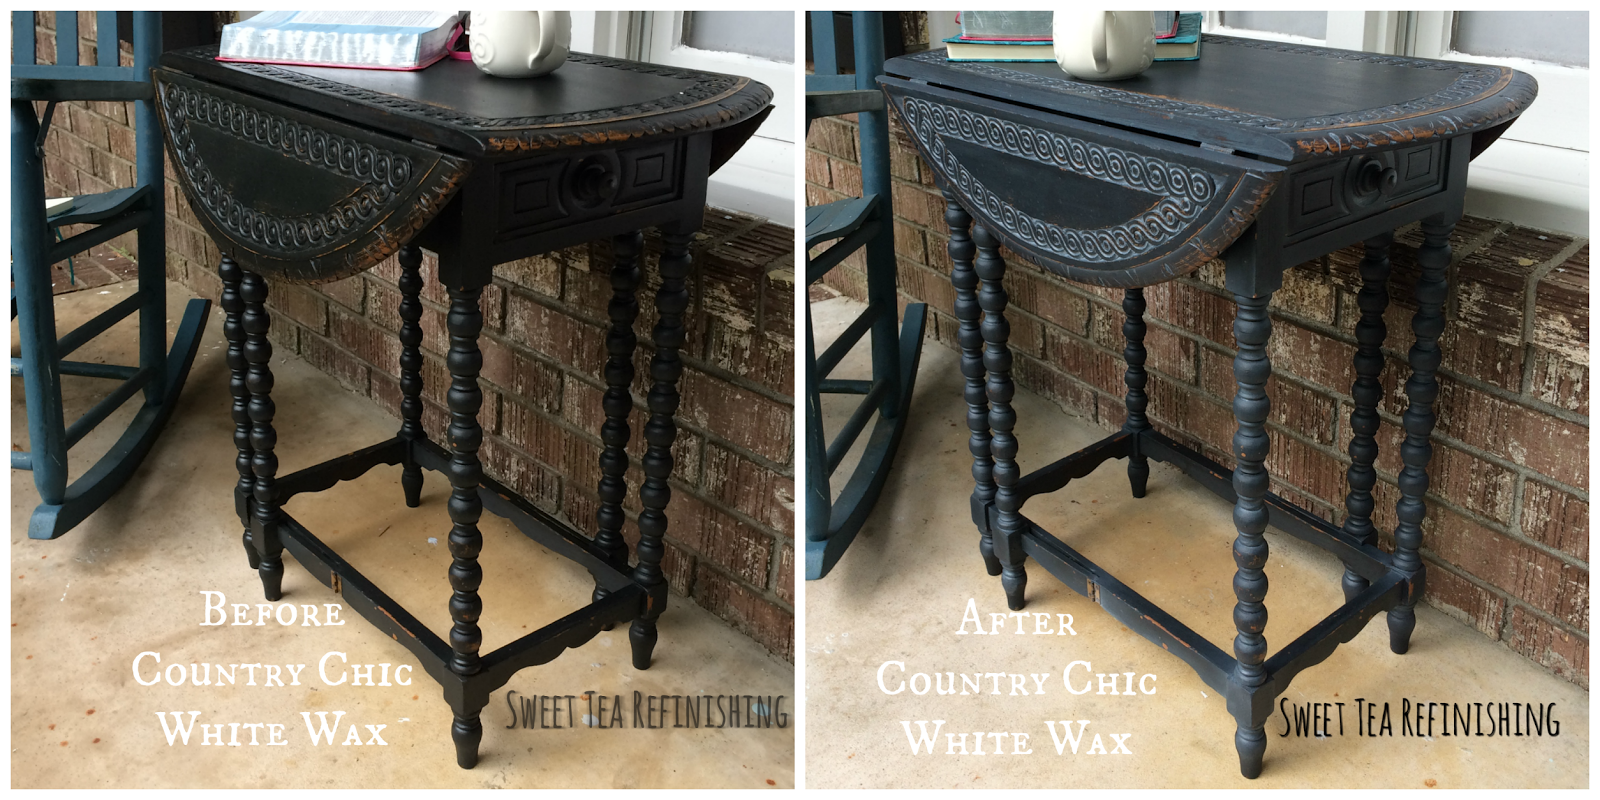
After the table was totally cured and I’d lived with it for a while, I decided to add another layer to change it up some. I went over the whole piece with some white furniture wax and ended up loving the final outcome. Look how much it changed the entire feel of the table!
It took a little work, but I love the way the table ended up!
Wrapping up Old Fashioned Milk Paint
Whether you choose to make your own with curds, whey, and some powdered pigment or buy it pre-made, milk paint is a really fun option for your next DIY adventure.
Let us know in the comments— what are you going to paint with milk paint? We can’t wait to hear about your projects!

Stephanie Lamberth is a writer who loves crafting, playing board games with family and friends, and cozying up in a warm blanket to get lost in good fiction books.
Crafting has been a part of her life for as long as she can remember. She comes by it naturally, with her mom encouraging it from a young age with a craft bin always busting from the seams with goodies to experiment with and explore. Her favorite things to craft these days are gifts to give family and friends because it’s an opportunity to express creativity and love at the same time!
She currently lives with her husband and three kids in Tennessee. They all work and school from home and love spending time together!
Stephanie can be reached at [email protected]
ElevenGables
Sunday 26th of March 2017
I love it!! Thanks so much for your suggestions! I'm looking forward to tackling this project!! xx
Thea Osborne
Friday 16th of December 2016
Haha! I know! There is so much talent! Good luck!! :-)
Brenda Young
Friday 16th of December 2016
Gosh Thea what a beautiful color mix! And a great read on color history as well, I love the carved details of your little experiment piece that turned out just sublime! Thanks for sharing at Fridays Furniture Fix, you guys make choosing the feature so hard!
Clockwork Interiors
Friday 23rd of September 2016
Gorgeous table, Thea, and I really loved the back story on Charleston Green. We lived in Charlotte, NC for 7 years, and Charleston was our favorite get away. You are blessed to live in such a beautiful city, and I'm happy to know a little more about it's history. Thanks for sharing, Cynthia
Jenni
Sunday 18th of September 2016
Love this in the almost-black! So much going on with the cool little table, it just doesn't need a lot of color too. Great job!