Easter décor is rapidly joining the ranks as some of the most popular holiday decorations on the market. And at the forefront of design possibilities, the Easter carrot is constantly becoming more versatile and well-loved.
Whether you are in the mood for some simpler DIY Easter carrot décor or feeling in the mood for a more hands-on project, we have got you covered! Read on for a roundup of all kinds of fun DIY Easter décor ideas.
1. Easy Assembly DIY Easter Carrot Wreath
Sometimes, it can be hard to find Easter carrot décor that fits a more upscale, grown-up, or modern aesthetic. Many folks are hunting for easter carrot décor that is charming and classy or fits into a more classic holiday atmosphere. And, to boot, you want something that’s easy to assemble and won’t require hours of DIY work to assemble.
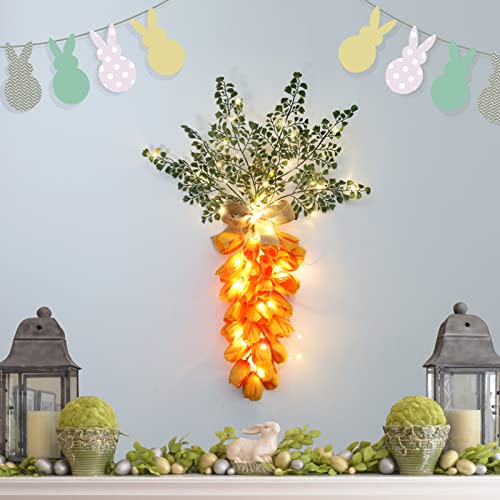
If that sounds like your situation, then we recommend this Easter Decorations Wreath to meet your simple Easter carrot décor needs! This beautiful wreath is made of orange, silken tulips and lifelike green foliage, with a burlap tie that shapes it all into a perfect carrot cone.
The string lights in this decorative silk wreath make it the perfect Easter décor for daytime or nighttime, indoor or outdoor hanging. It’s also super low assembly…simply arrange the string lights, fluff out the tulips, which are flattened for transportation purposes, and find the best place to show off this exquisite piece of Easter carrot décor!
2. DIY Wooden Easter Carrot Craft Kit
Looking to enjoy a more hands-on, crafty DIY kind of easter carrot décor? Then we recommend this DIY Wooden Carrots Craft Kit. This adorable kit comes with a couple of options to meet a variety of DIY easter carrot décor preferences.
The first option, the Wood Blanks Only, comes with just three precut wooden carrots. These are already shaped and sanded and can then be decorated to your heart’s content. Be prepared to use your own materials that you have purchased separately or already have on hand to transform these blank wooden carrots into your own easter carrot décor masterpiece!
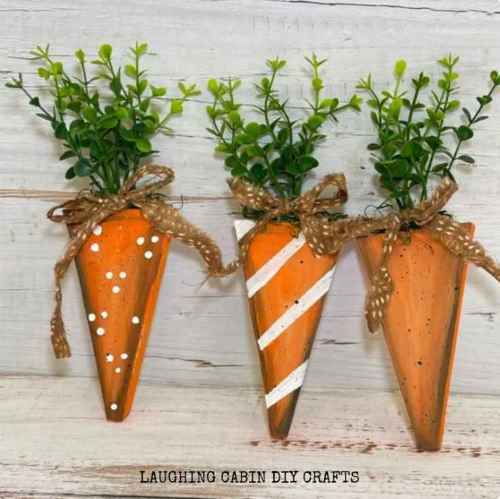
For those looking for more structure and guidance in their DIY Easter décor project, you can purchase the Full Kit from the Etsy shop. This will come with three carrot-shaped, sanded wood blanks; in addition, you will receive three acrylic paint colors in black, white, and orange, three strips of brown fabric, three pieces of artificial greenery, and a set of 10 paint brushes.
Whichever option you choose, you have the ability to make some truly personalized Easter carrot décor with this kit option. Imagination is the only limit to how you can decorate these wooden blanks. So this can really be a fun project for adults and children alike!
Kiddos still learning fine motor skills can enjoy finger-painting with their own washable paints on the wooden blanks, while older children and adults can have fun meticulously decorating some DIY wooden easter carrot décor that will no doubt be used every holiday for years to come!
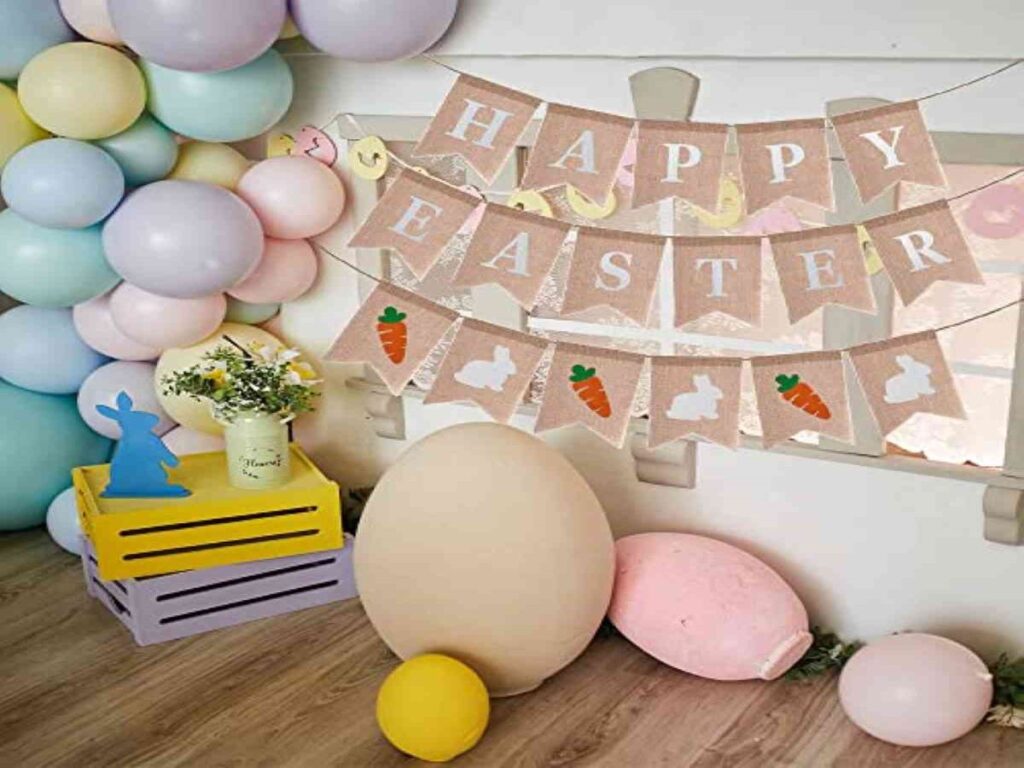
3. Easter Carrot Décor Signage
If you are a big fan of classic décor signage that fits well with a farmhouse or general easter carrot décor theme, look no further than the Happy Easter Burlap Banner for your décor needs! This felt pennant banner features a Happy Easter message and pennants featuring vivid orange carrots and beautiful white bunny outlines.
The four different rows of this signage can also be arranged row by row; however, you need them to fit with your specific decorative needs! They can form one long banner, or you can layer each piece to fill a bigger, blank space.

This DIY Easter sign will look great hanging from a mantle or on the wall behind an easter breakfast buffet! It can also make for a fun project with kiddos, as the white lettering and white bunnies can be painted over in any variety of colors for a special, hands-on, personalized version.
This signage also makes for a great feature in Easter photo shoots with little ones since it’s easy to use and low maintenance, blends well with a variety of background themes, and is safe to use even around little exploring hands.
This can really be an ideal piece of Easter DIY décor, particularly for families with curious kiddos!
4. DIY Easter Carrot Baby Footprints
Whenever a new baby joins the family or friend circle, it becomes a priority for many to preserve memories, like the first holidays and other special occasions. From Thanksgiving turkey hand art to Christmas tree feet fun, we see this for almost every holiday…but what about Easter?
When it comes to adding baby Easter memories to the mix, we’ve got you covered! Families looking for a truly personal touch with their Easter carrot décor can pick up the Carrot Patch Farm Sign With Baby Footprints craft kit! This wonderful little kit sets the stage perfectly for the most unforgettable piece of Easter carrot décor.
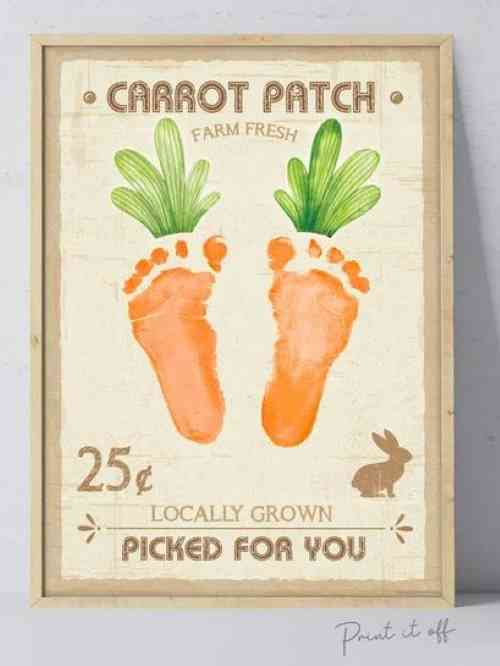
This piece is a digital download, so when you purchase it, you will have instant access to download the carrot patch farm sign immediately—no shipping time required! Then, all you need is a paper of your choice, just a bit of nontoxic orange paint, and those wiggly baby toes. This carrot patch sign will transform your baby’s footprint into an unforgettable farm sign!
This item is perfect for any kind of décor, from farmhouse chic to modern, and can be modified to your liking by choosing your preferred stock, weight, and color of paper to print it out on. Best of all, it keeps the memory of precious little ones close to the heart during a family-focused holiday.
Wrapping Up Simple Easter Carrot Décor You Can Make
Excited to make some Easter carrot décor that perfectly fits your space? How about making crafts with those egg cartons left over from your Easter egg hunt? Our craft page has more DIY ideas for kids and adults alike.

Renee Dugan is a lifelong writer, professional editor, and work-from-home-mom.
A Midwest girl born and raised, Renee has a passion for hands-on work, a self-made environment, crafting, and creating seasonal aesthetics (especially at Christmastime).
Now that she’s added motherhood to her repertoire alongside a lifetime of writing and editing, Renee continues to grow and expand her love for creating spaces that feel like home. That’s why she’s so excited to share ideas for how to make your space feel magical on That Sweet Tea Life!
Renee can be reached at [email protected]
Jayne
Tuesday 3rd of March 2020
This is so cute! And now that my grandson is turning 2 I'm looking for super easy projects to do with him :D
Thea Osborne
Tuesday 3rd of March 2020
Oh thank you Jayne!! Hope y'all get to make your own! Id love to see them! How precious... <3